Experiments on Golang Ssh Package

Golang is one of the best programming language in recent times which made most of the developers transform their development stream to it with all its capabilities (which i’m not gonna talk about it) .

From the day 1 of my journey towards Golang it was bit awesome starting from Hello World Program to the recent SSH package based program.Thanks to @Deva for all his guidance in making me solve the basic problems with the language.

As part of the Project which i’m doing Dockerstack there was a functionality which have to be written to execute commands on remote servers and then come the SSH Package ,though it took some time for it to understand but with all the availability of the online blog posts on how to use this package made me write my own way of implementation.

Reference Blog Posts

http://golang-basic.blogspot.in/2014/06/step-by-step-guide-to-ssh-using-go.html

Basic Program

package main

import (
 "bytes"
 "fmt"
 "golang.org/x/crypto/ssh"
 "log"
 "time"
)

var stdoutBuf bytes.Buffer

func main() {

 v := time.Now()

 fmt.Println("Execution started @:", &v)

 config := &ssh.ClientConfig{
 User: "vagrant",
 Auth: []ssh.AuthMethod{
 ssh.Password("vagrant"),
 },
 }

 conn, err := ssh.Dial("tcp", "172.27.4.178:22", config)
 if err != nil {
 log.Fatal(err)
 }

 session, err := conn.NewSession()
 if err != nil {
 log.Fatal(err)
 }

 defer session.Close()

 session.Stdout = &stdoutBuf

 if err := session.Run("whoami"); err != nil {
 log.Fatal(err)
 }

 fmt.Println(stdoutBuf.String())

 fmt.Println("Execution Time Took:", time.Since(v))

}

Expected Output

vagrant@dhcppc2:/vagrant/go-tutorials$ go run blog.go
Execution started @: 2015-08-27 14:16:16.433186309 +0000 UTC
vagrant
Execution Time Took: 359.647428ms

I just love the way how the time package shows me the time phrase to show the total execution time it took to execute the command on the remote server.

Will Update this post more when i see any new use case i come across.

How to write your own Kubernetes Cluster Provider-01

Kubernetes is one of the Clustering Model for Docker Based Infrastructure and it can be launched on any of the cloud providers like AWS,Rackspace,GCE and some of the Private cloud implementations can also be done like on Vsphere,Juju and you can run on Local with Vagrant or on Docker as well.

So for the beginners to understand on how the cluster can be formed the kubernetes repo have some predefined scripts which help us to run the Cluster with one shot.

KUBE_PROVIDER={provider_name} ./kube-up.sh

Before doing this make sure that we meet the prerequisites for the implementation to do.Lets take an example of AWS way of creating the cluster then we may need to install the awscli and then add the configuration about the account and the accesskeys and privatekeys where the awscli can talk to the API Endpoints.

So if you go to the Kubernetes repo you can see the Cluster folder which it have the list of cloud providers which you would like to run the cluster.

.
├── addons
│   ├── cluster-monitoring
│   │   ├── google
│   │   ├── googleinfluxdb
│   │   ├── influxdb
│   │   └── standalone
│   ├── dns
│   │   ├── kube2sky
│   │   └── skydns
│   ├── fluentd-elasticsearch
│   │   ├── es-image
│   │   ├── fluentd-es-image
│   │   └── kibana-image
│   ├── fluentd-gcp
│   │   └── fluentd-gcp-image
│   └── kube-ui
├── aws
│   ├── coreos
│   ├── jessie
│   ├── templates
│   │   └── iam
│   ├── trusty
│   ├── vivid
│   └── wheezy
├── azure
│   └── templates
├── gce
│   ├── coreos
│   ├── debian
│   └── trusty
├── gke
├── images
│   ├── etcd
│   ├── hyperkube
│   ├── kubelet
│   └── nginx
├── juju
│   ├── bundles
│   ├── charms
│   │   └── trusty
│   │   ├── kubernetes
│   │   │   ├── files
│   │   │   ├── hooks
│   │   │   │   └── lib
│   │   │   └── unit_tests
│   │   │   └── lib
│   │   └── kubernetes-master
│   │   ├── actions
│   │   │   └── lib
│   │   ├── files
│   │   ├── hooks
│   │   └── unit_tests
│   └── prereqs
├── libvirt-coreos
├── mesos
│   └── docker
│   ├── common
│   │   └── bin
│   ├── km
│   │   └── opt
│   └── test
│   └── bin
├── ovirt
├── rackspace
│   └── cloud-config
├── saltbase
│   ├── pillar
│   ├── reactor
│   └── salt
│   ├── cadvisor
│   ├── debian-auto-upgrades
│   ├── docker
│   ├── etcd
│   ├── fluentd-es
│   ├── fluentd-gcp
│   ├── generate-cert
│   ├── helpers
│   ├── kube-addons
│   ├── kube-admission-controls
│   │   └── limit-range
│   ├── kube-apiserver
│   ├── kube-controller-manager
│   ├── kubelet
│   ├── kube-master-addons
│   ├── kube-proxy
│   ├── kube-scheduler
│   ├── logrotate
│   ├── monit
│   ├── nginx
│   ├── ntp
│   ├── openvpn
│   ├── openvpn-client
│   ├── salt-helpers
│   ├── static-routes
│   └── supervisor
├── ubuntu
│   ├── master
│   │   ├── init_conf
│   │   └── init_scripts
│   └── minion
│   ├── init_conf
│   └── init_scripts
├── vagrant
└── vsphere
 └── templates

If you can see the above tree command output we have different cloud providers list which we can run.Now how we can write our own Cloud provider enable to create the Kubernetes Cluster for us.

So if you see the main files which are responsible for calling the specified cloud provider files

├── kubectl.sh
├── kube-down.sh
├── kube-env.sh
├── kube-push.sh
├── kube-up.sh
├── kube-util.sh
├── validate-cluster.sh
├── common.sh

kube-up.sh is used to call the respective files associated in making the cluster up.Lets have a look what is written inside the kube-up script

#!/bin/bash

set -o errexit
set -o nounset
set -o pipefail

KUBE_ROOT=$(dirname "${BASH_SOURCE}")/..
source "${KUBE_ROOT}/cluster/kube-env.sh"
source "${KUBE_ROOT}/cluster/kube-util.sh"

echo "... Starting cluster using provider: $KUBERNETES_PROVIDER" >&2

echo "... calling verify-prereqs" >&2
verify-prereqs

echo "... calling kube-up" >&2
kube-up

echo "... calling validate-cluster" >&2
validate-cluster

echo -e "Done, listing cluster services:\n" >&2
"${KUBE_ROOT}/cluster/kubectl.sh" cluster-info
echo

exit 0

If you see above script it uses the global kube-env and util file in pointing to the right files which are available inside the respective cloud provider folder.So the flow in creating the cluster is like below

verify-prereqs  ------> kube-up ----> validate-cluster ----> cluster-info

if you check the kube-util.sh file which have the information about the functions they try pointing to the cloudprovider folder based util.sh file

kube-util.sh

#!/bin/bash

# A library of helper functions that each provider hosting Kubernetes must implement to use cluster/kube-*.sh scripts.

KUBE_ROOT=$(dirname "${BASH_SOURCE}")/..

# Must ensure that the following ENV vars are set
function detect-master {
 echo "KUBE_MASTER_IP: $KUBE_MASTER_IP" 1>&2
 echo "KUBE_MASTER: $KUBE_MASTER" 1>&2
}

# Get minion names if they are not static.
function detect-minion-names {
 echo "MINION_NAMES: [${MINION_NAMES[*]}]" 1>&2
}

# Get minion IP addresses and store in KUBE_MINION_IP_ADDRESSES[]
function detect-minions {
 echo "KUBE_MINION_IP_ADDRESSES: [${KUBE_MINION_IP_ADDRESSES[*]}]" 1>&2
}

# Verify prereqs on host machine
function verify-prereqs {
 echo "TODO: verify-prereqs" 1>&2
}

# Validate a kubernetes cluster
function validate-cluster {
 # by default call the generic validate-cluster.sh script, customizable by
 # any cluster provider if this does not fit.
 "${KUBE_ROOT}/cluster/validate-cluster.sh"
}

# Instantiate a kubernetes cluster
function kube-up {
 echo "TODO: kube-up" 1>&2
}

# Delete a kubernetes cluster
function kube-down {
 echo "TODO: kube-down" 1>&2
}

# Update a kubernetes cluster
function kube-push {
 echo "TODO: kube-push" 1>&2
}

# Prepare update a kubernetes component
function prepare-push {
 echo "TODO: prepare-push" 1>&2
}

# Update a kubernetes master
function push-master {
 echo "TODO: push-master" 1>&2
}

# Update a kubernetes node
function push-node {
 echo "TODO: push-node" 1>&2
}

# Execute prior to running tests to build a release if required for env
function test-build-release {
 echo "TODO: test-build-release" 1>&2
}

# Execute prior to running tests to initialize required structure
function test-setup {
 echo "TODO: test-setup" 1>&2
}

# Execute after running tests to perform any required clean-up
function test-teardown {
 echo "TODO: test-teardown" 1>&2
}

# Set the {KUBE_USER} and {KUBE_PASSWORD} environment values required to interact with provider
function get-password {
 echo "TODO: get-password" 1>&2
}

# Providers util.sh scripts should define functions that override the above default functions impls
if [ -n "${KUBERNETES_PROVIDER}" ]; then
 PROVIDER_UTILS="${KUBE_ROOT}/cluster/${KUBERNETES_PROVIDER}/util.sh"
 if [ -f ${PROVIDER_UTILS} ]; then
 source "${PROVIDER_UTILS}"
 fi
fi

The Main Logic of calling the provider specific util.sh comes at the end of the kube-util.sh file which includes the real logic of the functions in getting up the server.

Will share the details on how i made one of the cloud provider implementation done to bring up the Cluster.

Golang – Glide Go Workspace Manager

When i started working on  Java based Application stack there use to be a version problems most of the time where JDK 1.5 is not compatible for some applications to run and need to update to JDK 1.6 and Vice versa with JDK 1.6 to 1.7 and when i started writing Python Programs to make sure the Libraries which i use should work with the interpreter i use but some times some libraries are not compatible with what ever Python installation i have on the server so then comes the power of using the Virtualenv where i can use the version of Python which my Application supporting Libraries support and then this sort of Version Managers have been seen in Ruby (RVM) , Nodejs (NVM), Golang (GVM).

Now one sort of Problem is solved by getting our own Version of Interpreter and then the list of libraries which we need to install but what if the we use a interpreter which uses a Workspace needs a place to install its packages dont know where to install.In go we have godep which is a dependency manager which most of the projects use to keep their workspace updated with their packages all the time where you need to declare your GOPATH variable to the location of the workspace which you are working on.

This issue or an enhancement for the developers is been resolved by Glide.Glide is a Dependency manager for your workspace  in a sophisticated way.

Install Glide

git clone https://github.com/Masterminds/glide.git
make bootstrap
cp -rf glide /usr/bin

Lets take one of the project which i was been working on in writing a server agent in Go.

git clone http://github.com/dockerstack/dockerstack-agent.git

when you clone the project to a local location then you need to execute

glide in     ---- > this command will make a workspace for the project with the GOPATH set so that to install all the packages it serves as the place to get them back

We need to create a file by name glide.yaml which have the information of all the packages which the application is trying to use.

Example glide.yaml file will be like this

# Glide YAML configuration file
# Set this to your fully qualified package name, e.g.
# github.com/Masterminds/foo. This should be the
# top level package.
package: dockerstack/dockerstack-agent
# Declare your project's dependencies.
import:
 # Use 'go get' to fetch a package:
 - package: github.com/fsouza/go-dockerclient
 vcs: git
 - package: github.com/Sirupsen/logrus
 vsc: git
 - package: github.com/pelletier/go-toml
 vsc: git
 - package: github.com/shirou/gopsutil/mem
 vsc: git
 - package: github.com/shirou/gopsutil/process
 vsc: git
 - package: github.com/mitchellh/go-ps
 vcs: git

If you see your glide.yaml seems good with the packages then execute

glide install --- > this will create a folder _vendor which keeps all the libraries related files there.

After the glide install here is a example folder strucutre

vagrant@dhcppc7:~/dockerstack-agent$ ls -lrt
total 76
drwxrwxr-x 2 vagrant vagrant 4096 Jul 7 21:07 logging
drwxrwxr-x 2 vagrant vagrant 4096 Jul 7 21:19 config
drwxr-xr-x 5 vagrant vagrant 4096 Jul 10 09:41 _vendor
drwxrwxr-x 5 vagrant vagrant 4096 Jul 15 11:50 docker
drwxrwxr-x 3 vagrant vagrant 4096 Jul 15 11:50 health
-rwxrwxr-x 1 vagrant vagrant 1019 Jul 15 18:12 testing.go
drwxrwxr-x 2 vagrant vagrant 4096 Jul 16 20:09 client
drwxrwxr-x 2 vagrant vagrant 4096 Jul 18 21:10 server
-rwxrwxr-x 1 vagrant vagrant 290 Jul 20 09:05 agent.toml
-rwxrwxr-x 1 vagrant vagrant 483 Jul 20 09:05 agent.go
-rwxrwxr-x 1 vagrant vagrant 17375 Jul 20 09:05 dockerstack-agent.png
-rwxrwxr-x 1 vagrant vagrant 672 Jul 20 09:05 glide.yaml
-rwxrwxr-x 1 vagrant vagrant 1079 Jul 20 09:05 LICENSE
-rwxrwxr-x 1 vagrant vagrant 303 Jul 20 09:05 Makefile
-rwxrwxr-x 1 vagrant vagrant 731 Jul 20 09:05 README.md

So far glide helps us in creating the workspaces so easily but when it comes to Multiple version interpreter using GVM then i see a problem in setting up the Glide which hopefully solves in the coming versions of Glide.

How to create identical images across the cloud providers with Packer.io -01

Lets take a example of a Ecommerce Company which have their Application running on Digital Ocean and then they thought they need to migrate to a better service provider and migrate most of their servers from Digital Ocean to Rackspace(Though the decision of changing the Cloud provider is so tough these days as most of the Cloud providers are providing promising Services).

So inorder to understand the stack of what the application consists of with related to its dependencies and other factors which make the application up and running.

Inorder to make the issue more complicated i will go with a  Loosely Coupled Application Architecture of Services interdependent on each others Service.

shopping-system

I have a Frontend service which runs the Application which show most of the inventories of different categories of things for a end user to buy and on the other side i have the Core Logic of the Application Divided in a Micro Service model where every main core logic of the application will be running on its own Service type and the data layer will be connecting to their individual DB’s to do the normal CRUD operations.

So seeing the traffic on the site they would like to scale their servers and move some part of the servers on to Rackspace which eventually change their stack totally from Digital Ocean to Rackspace.To make migration of server every System Admin have their own way of doing it keeping in my mind about the downtime.(This can be implemented in many ways which i will be going up with one approach)

They started using one of the Configuration management tool and started writing the dependency packages and the total infrastructure services and configuration information to provision around 40 servers at a time and divide them into groups based upon the services.

That approach is always good to go but there will be mainly a issue with related to the time it takes to provision all the 40 servers by provisioning them with the services installed and the provisioning should be much faster when there is any scale-up activities happening on demand.

So inorder to reduce this issue we may install the whole application stack before the provisioning starts from any configuration tool so that the time of installing will be reduced in return applying the configurations will be faster.

Introducing Packer.io from Hashicorps where they have a solution to install the application stack across the cloud providers in no time by creating templates which does most of the Application Installations and create a image or a snapshot where the Configuration Management tools take  them as their base image to create servers.

Packer-520x245


Packer is a tool which helps us creating the identical machine images across the cloud providers so that the pain of Provisioning the servers by installing the application will be reduced and Configuration of the files to point to multiple services will be taken care by the Configuration management tools.

With this the Approach the Server Migration from one Cloud Provider (Can be a Public — > Private or Private — > Public) will be really easy.

Packer is written in Golang and as of now it supports

1)AWS

2)Digital Ocean

3)GCE

4)Openstack

5)Vmware

6)Virtualbox

7)Parallels

8)Docker

Packer Template are written in Json and Packer Template consists of mostly the given below Template blocks

1)Variables

2)Builders

3)Provisioners

Variables

Variables are like declaring on what variables we need to use in the Template.

Example–

"variables":{
        "aws_access_key":"xxxxxxxxxxxxxxxxxxxxx",
         "aws_secret_key":"yyyyyyyyyyyyyyyyyyyyyyyyyyyyyyyyyyyyy"
 },
"builders":[{
             "type" : "amazon-ebs",
              "access_key": "{{ user `aws_access_key`}}",
               "secret_key": "{{user `aws_secret_key`}}",

Builders

Builders will help in Creating the Image on which Provider.Like the above example we are using the Amazon EBS storage based instances in creating the image.

Provisioner

Provisioner will help us to write on what packages have to be installed on the image and what files have to be pulled on to the image from the local path where we start running the Packer command.

Working Process

Packer which it takes the given above template blocks to provide the Image will initially start a instance on the respective Cloud provider and does the whole Server Provisioning with related to the Application installation and then when the process is done it creates a Image from that instance and stops running the image and in return terminates when the whole installation process is done.

This Image which have a new Image id will be used by the Configuration management tools in creating the Instances and do the minimal Configuration changes for the Application Stack to get connected.

Packer internals will be in the next part of the Post.Stay Tuned…!!!!


Openstack Kilo AllinOne and Multi-Node Installation RHEL and Ubuntu 14.04LTS On IBM Softlayer BAAS -01

Softlayer have launched their Bare Metal Service on Jan 15th 2015 to give lot more Raw Power for any of the Bare Metal Server requirements at a very reasonable cost and infact their services where one of the unique and reliable services at a bare metal servers as a service and they give this service in most of the data centers they have and with their recent Datacenter in Sydney we can get a 500$ offer on those servers if we use 500SYD Promo code.

We Took 3 Bare Metal Servers with Given Node Requirements

1)Ram — 8Gb

2)HDD – 1TB

3)NICs– 2


I choose Openstack Kilo as my Version to Install on these Bare Metal Servers.In order to get hands on i always recommend people to understand how to install openstack in various ways so i proceeded with the following

1)Install Openstack All in one with Packstack on One node

2)Install Openstack Multi Node with Packstack on Three Nodes

3)Manual Installation of Openstack by walking through the Openstack Docs

4)Write Your Own Automation Scripts (Ansible,SaltStack) to install All in One and Multi Node Openstack Installation

Openstack installation through Packstack All in One

Installing through Packstack is mainly recommended for any Lab setup but when it comes to a Prodcution based Deployment it is always recommended to create their own strategy to install them across the Bare metal servers

What is Packstack?

Packstack  is a group of Puppet Manifests which help us to install the Openstack in a automated way.It can be installed as

Preparing the System for Multi Node Setup

  • subscription-manager register
  • subscription-manager attach –auto
  • subscription-manager repos --enable rhel-7-server-optional-rpms
  • subscription-manager repos --enable rhel-7-server-extras-rpms
  • yum list
  • yum update all

DISABLE NetworkManager

  • systemctl stop NetworkManager
  • systemctl disable NetworkManager
  • systemctl restart network

Packstack Repo Download

JUNO Release --
yum install https://repos.fedorapeople.org/repos/openstack/openstack-juno/rdo-release-juno-1.noarch.rpm

Latest Release

yum install https://repos.fedorapeople.org/repos/openstack/latest/rdo-release.rpm

yum install -y openstack-packstack

Packstack Commands

Lets create a Answerfile

packstack --gen-answer-file answerfile.txt

Lets edit some of the parameters in the answerfile

# Specify 'y' to configure the Open vSwitch external bridge for an
# all-in-one deployment (the L3 external bridge acts as the gateway
# for virtual machines). ['y', 'n']
CONFIG_PROVISION_ALL_IN_ONE_OVS_BRIDGE=y

The install with the following command

packstack --answer-file  answerfile.txt

The above settings will make sure in creating a network Ovs bridge based network taking one of the NIC Interface.

Openstack Networking  — Neutron

Open vSwitch Neutron builds three network bridges:

  • br-int

The br-int bridge connects all instances

  • br-tun

The br-tun bridge connects instances to the physical NIC of the hypervisor.

  • br-ex.

The br-ex bridge connects instances to external (public) networks using floating IPs.

Note– . Both the br-tun and br-int bridges are visible on compute and network nodes. The br-ex bridge is only visible on network nodes.

Neutron on the Physical Machine have the following Components

Tap interface: tapXXXX
Linux bridge: qbrYYYY
Veth pair: qvbYYYY, qvoYYYY
OVS integration bridge: br-int
OVS patch ports: int-br-ethX, phy-br-ethX
OVS provider bridge: br-ethX
Physical interface: ethX

Ovs-patch-cable


Based upon that the Total Neutron Architecture will be like the below diagram

Neutron-Vm-setup


How to create and understand NameSpace based Tutorials will be updated soon with Multi Node Setup of Openstack through Packstack.


Docker {Machine-Swarm-Compose} Magic around the Whale -02

Docker Swarm

Docker Swarm is another tool from Docker where it does the cluster Management of the Docker Instances Across Multiple Cloud Providers.

Initially we will be spinning the Docker instances through Docker machine.To know how to setup the docker-machine can go through the Docker {Machine-Swarm-Compose} Magic around the Whale -01.

export AWS_ACCESSKEY={your own aws account accesskey}
exprt AWS_SECRETKEY={your own aws account secretkey}

Then we need to create the Master Swarm node through docker-machine before that we need to create a Swarm Token

docker run swarm create

Based on the output we take the token Id we will create a Swarm Master node

docker-machine create -d amazonec2 --amazonec2-access-key $AWS_ACCESSKEY --amazonec2-secret-key $AWS_SECRETKEY \
--amazonec2-instance-type "t2.medium" --amazonec2-region "us-east-1"\
--amazonec2-vpc-id "{{Vpc-Id}}" --amazonec2-subnet-id "{{Subnet-Id}}"\
--swarm --swarm-master --swarm-discovery token://3d4efe3135c2b63c127ab5063aee6ff8 \
swarm-node-master

This will create us with the Swarm Master node and now we need to create the Swarm nodes

docker-machine create -d amazonec2 --amazonec2-access-key $AWS_ACCESSKEY --amazonec2-secret-key $AWS_SECRETKEY \
--amazonec2-instance-type "t2.medium" --amazonec2-region "us-east-1" \
--amazonec2-vpc-id "vpc-8e3317eb" --amazonec2-subnet-id "subnet-61106116" \
--swarm --swarm-discovery token://3d4efe3135c2b63c127ab5063aee6ff8 swarm-node-00

So we will be creating another swarm node and we will be attaching it to the Swarm master using the token id.Lets see if we can see the information about the Swarm Cluster

ubuntu@ip-10-20-30-42:~$ docker info
Containers: 14
Images: 5
Role: primary
Strategy: spread
Filters: affinity, health, constraint, port, dependency
Nodes: 3
 swarm-node-00: 54.172.29.140:2376
 └ Containers: 7
 └ Reserved CPUs: 0 / 2
 └ Reserved Memory: 0 B / 4.052 GiB
 └ Labels: executiondriver=native-0.2, kernelversion=3.13.0-53-generic, operatingsystem=Ubuntu 14.04.2 LTS, provider=amazonec2, storagedriver=aufs
 swarm-node-01: 54.175.55.195:2376
 └ Containers: 1
 └ Reserved CPUs: 0 / 2
 └ Reserved Memory: 0 B / 4.052 GiB
 └ Labels: executiondriver=native-0.2, kernelversion=3.13.0-53-generic, operatingsystem=Ubuntu 14.04.2 LTS, provider=amazonec2, storagedriver=aufs
 swarm-node-master: 54.172.181.206:2376
 └ Containers: 6
 └ Reserved CPUs: 0 / 2
 └ Reserved Memory: 0 B / 4.052 GiB
 └ Labels: executiondriver=native-0.2, kernelversion=3.13.0-53-generic, operatingsystem=Ubuntu 14.04.2 LTS, provider=amazonec2, storagedriver=aufs
CPUs: 6
Total Memory: 12.16 GiB

The above cluster information we can get it by running the following command

eval "$(./docker-machine env --swarm  swarm-node-master)"

Now we will run some containers on these machines .I will be running a small script to create 50 containers through a small shell script

for i in {1..50};
 do 
k=$(expr 80 + $i); 
docker run -itd -p $k:80  ubuntu /bin/bash;
 done

Now lets check the list of containers based upon their ip’s on how many containers have been launched on the Cluster nodes.

ubuntu@ip-10-20-30-42:~$ docker ps|grep 54.175.55.195|wc -l
27
ubuntu@ip-10-20-30-42:~$ docker ps|grep 54.172.181.206|wc -l
24

We can see the output of the running docker containers

Docker-swarm-example


Next Post will be on how to write a Docker-compose based templates over the Swarm Cluster

Golang — My First Hello World Web Server

Tools and methodologies in the Devops ecospace are being catching the pace day by day and Golang is one such language which made me to start thinking on how i can make installations across multiple environments.

To start with Golang is being one of the programming language from Rob Pike infact he is the one behind Golang and Golang is so flexible to learn its Syntax but needs some Programming language experience to understand and it will be piece of cake for C or C++ Programmers.

I started writing lot of simple programs in Golang so far and now i feel i’m in a good state to write my first public code on Golang and will start with a Web Server which shows a Hello World String on the page body.

Golang installation is pretty straight forward if you are in Windows just install it from the msi or exe file which you get it from the GoLang Download and if you are installing it on Ubuntu or any linux server then use the following command to install

apt-get install golang

After that to make sure you check the go based env so for that use

go env

Create a Project folder

mkdir HelloWorld

And then make sure the following env variables will route to the Project folder.
export GOPATH=`pwd`
export GOBIN=`pwd`\bin

Here GOPATH will route to the Project Folder where you can install the Packages inside the src directory and dependency packages inside the pkg folder.

Lets start writing the WebServer using some of the Builtin and Thirdparty Libraries

package main

import (
“fmt”
“os”
“github.com/gorilla/mux”
“net/http”
)

func HelloWorld(w http.ResponseWriter, r *http.Request){

                 w.Write([]byte(“Hello World!!!”))
}

func main(){

            r := mux.NewRouter()
            r.HandleFunc(“/”, HelloWorld)
            http.ListenAndServe(“:8080”,r)
}

To run the Code we need to first get the other third party libraries

go get

We need to run this command on the parent folder structure and then start the program

go run webserver.go

golang-webserver

Tada!!!!!!!

Lot more Golang Tutorials to come !!!!!!!

Docker {Machine-Swarm-Compose} Magic around the Whale -01

maxresdefault

Transformation of Applications to Docker way of implementations is taking the hold with most of the domains to most effective usage of the resources and for a better Micro Service Management  Strategy.

Docker as a Engine which operates as the light weighted container Hypervisor needs a helping hand with some of the tools which solves most of the orchestration and clustering problems which one eventually try to create a loop of servers on a single click.

Seeing that Issue Docker have created some magical tools around which gives solutions to some of the problems which can solve the Orchestration and Clustering of the Docker Containers across the Cloud Providers or any Hybrid Cloud Model.

Lets start the Fight


docker_ryu-e1431444592428

Docker {Machine}

Docker Machine is a tool which helps you provision servers on multiple cloud providers to install docker and give you the access to these machines over tcp port which the docker runs which exposes it api.

How to download Docker-Machine

Linux and Other Distros

$ curl -L https://github.com/docker/machine/releases/download/v0.2.0/docker-machine_darwin-amd64 > /usr/local/bin/docker-machine
$ chmod +x /usr/local/bin/docker-machine

Windows

curl -L https://github.com/docker/machine/releases/download/v0.2.0/docker-machine_windows-amd64.exe > /usr/local/bin/docker-machine

How to run

I use Cygwin on my machine to make use of the Linux based functionalities on the machine easily,so i saved the docker-machine.exe in the /usr/local/bin/docker-machine

docker-machine

so after that we need to create a instance on  a aws and docker-machine comes up with most of the Cloud providers integration like IBM Softlayer,DigitalOcean,Rackspace and AWS and also with some of the private cloud providers like Openstack,Vmvspehere.

So Lets create a instance on AWS

On a Special Note is that Docker have release there Windows client where we can connect to the docker instances with their api.

You can download it from the Windows Package manager Chocolatey.

Before creating the instance make sure to understand on what options are available to create on aws

 --amazonec2-access-key     AWS Access Key [$AWS_ACCESS_KEY_ID]
 --amazonec2-ami            AWS machine image [$AWS_AMI]
 --amazonec2-iam-instance-profile        AWS IAM Instance Profile
 --amazonec2-instance-type "t2.micro"    AWS instance type [$AWS_INSTANCE_TYPE]
 --amazonec2-region "us-east-1"          AWS region [$AWS_DEFAULT_REGION]
 --amazonec2-root-size "16"              AWS root disk size (in GB) [$AWS_ROOT_SIZE]
 --amazonec2-secret-key                  AWS Secret Key [$AWS_SECRET_ACCESS_KEY]
 --amazonec2-security-group "docker-machine"  AWS VPC security group [$AWS_SECURITY_GROUP]
 --amazonec2-session-token                    AWS Session Token [$AWS_SESSION_TOKEN]
 --amazonec2-subnet-id                        AWS VPC subnet id [$AWS_SUBNET_ID]
 --amazonec2-vpc-id                           AWS VPC id [$AWS_VPC_ID]
 --amazonec2-zone "a" AWS zone for instance (i.e. a,b,c,d,e) [$AWS_ZONE]

So lets export the AWS Accesskey and Secretkey

export AWS_ACCESSKEY={your own aws account accesskey}
exprt AWS_SECRETKEY={your own aws account secretkey}

Creating the Instance on AWS

docker-machine create -d amazonec2 --amazonec2-access-key $AWS_ACCESSKEY \
--amazonec2-secret-key $AWS_SECRETKEY \
--amazonec2-instance-type "t2.medium" \
--amazonec2-region "us-east-1" \
--amazonec2-vpc-id "vpc-8e3317eb" \
--amazonec2-subnet-id "subnet-61106116" Demo123

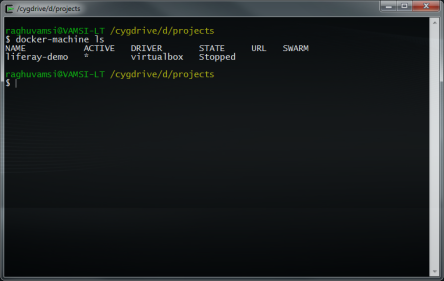
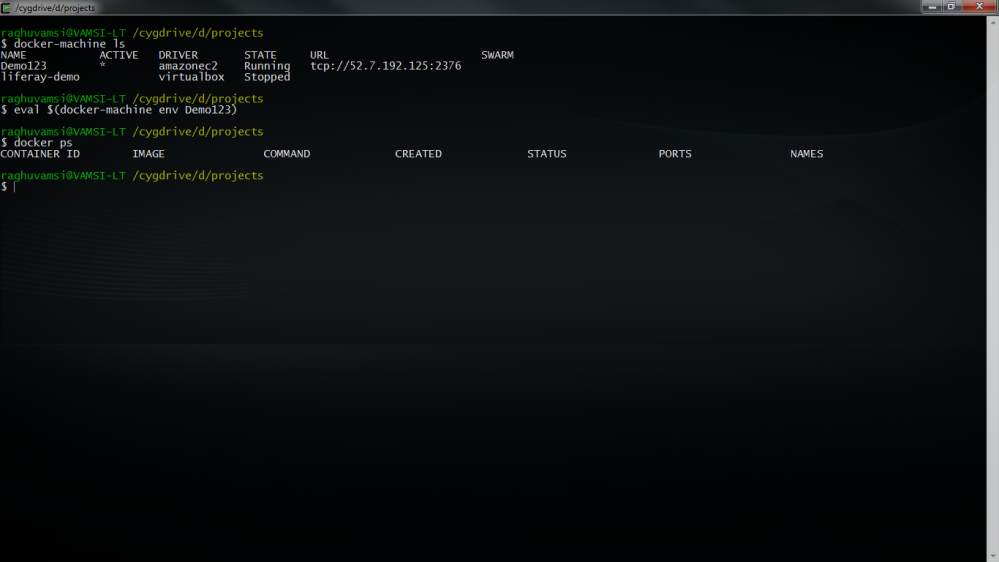
Instance creation may take some time to do lot more magical stuff to provision you the instance with a running docker on top of it.After creating the instance lets see if we can see it in the list of instances from docker-machine output.

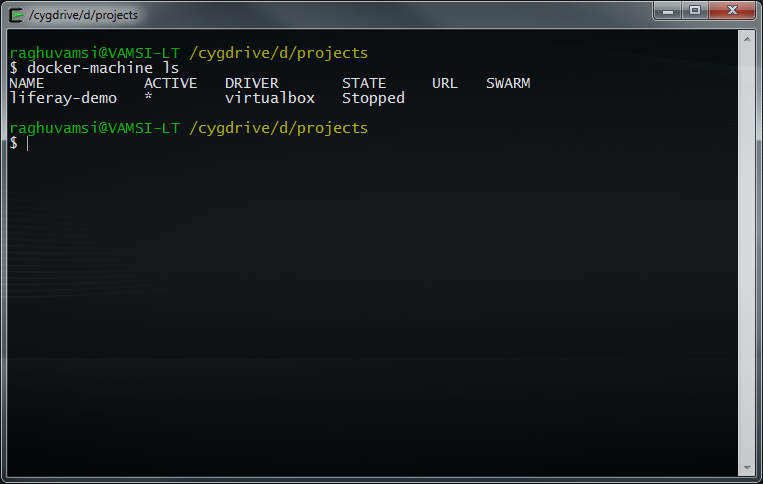
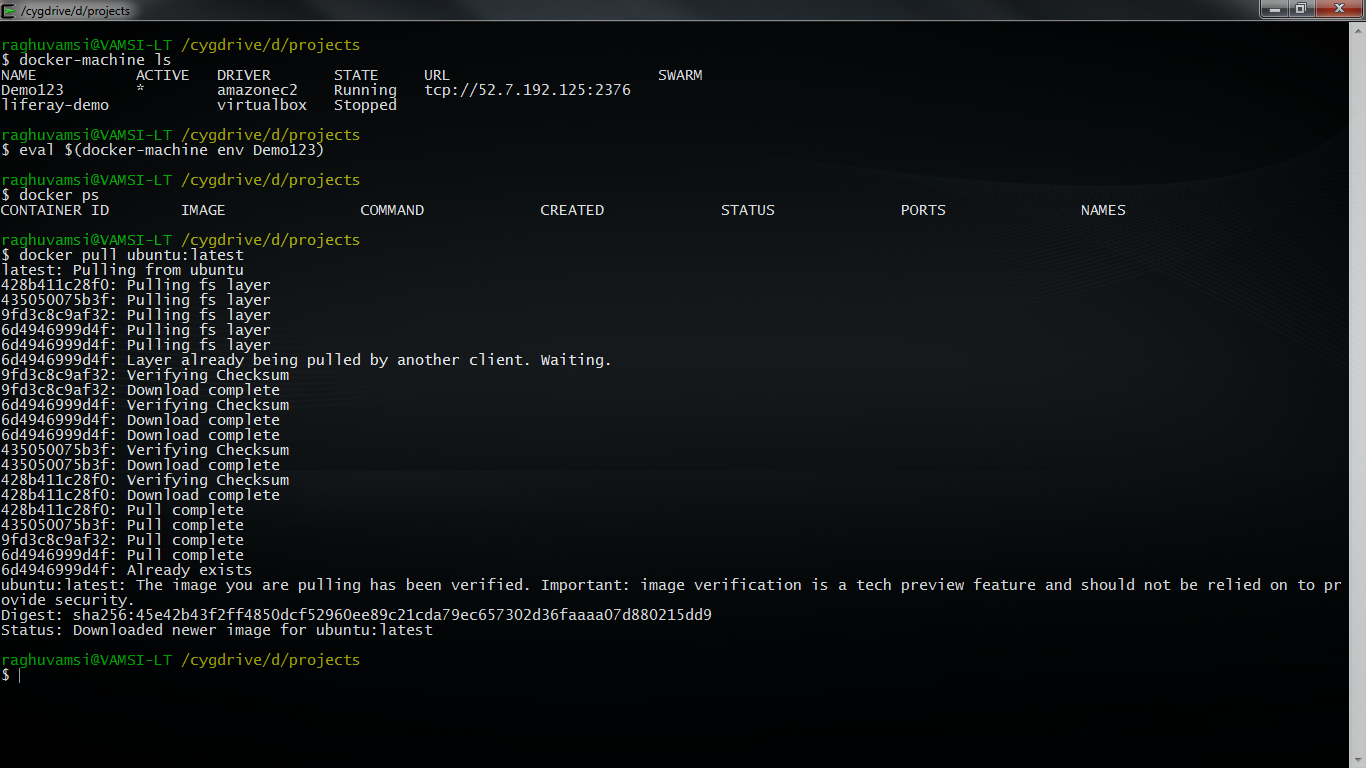
raghuvamsi@VAMSI-LT /cygdrive/d/projects
$ docker-machine ls
NAME       ACTIVE  DRIVER     STATE     URL                      SWARM
Demo123       *   amazonec2   Running   tcp://52.7.192.125:2376
liferay-demo      virtualbox  Stopped

Now lets check connecting to the instance .If you are running on a CYGWIN based environment then we need to run this command

eval $(docker-machine env Demo123)

So now lets check it with the docker command and see whether we can run some of the docker commands

docker-machine2

Now lets pull some images on this Machine

docker-machine3

We have pulled ubuntu image on this machine

docker-machine4

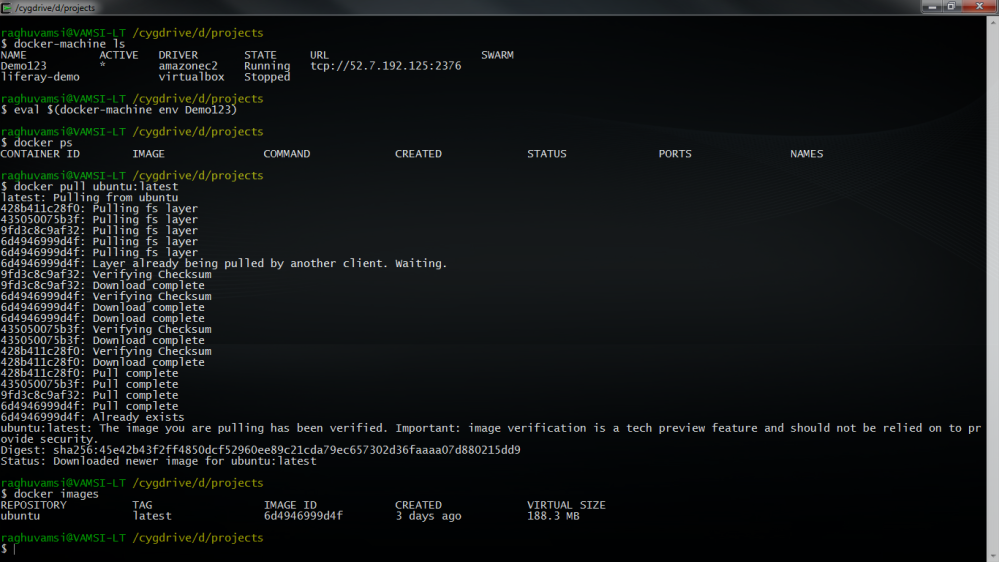
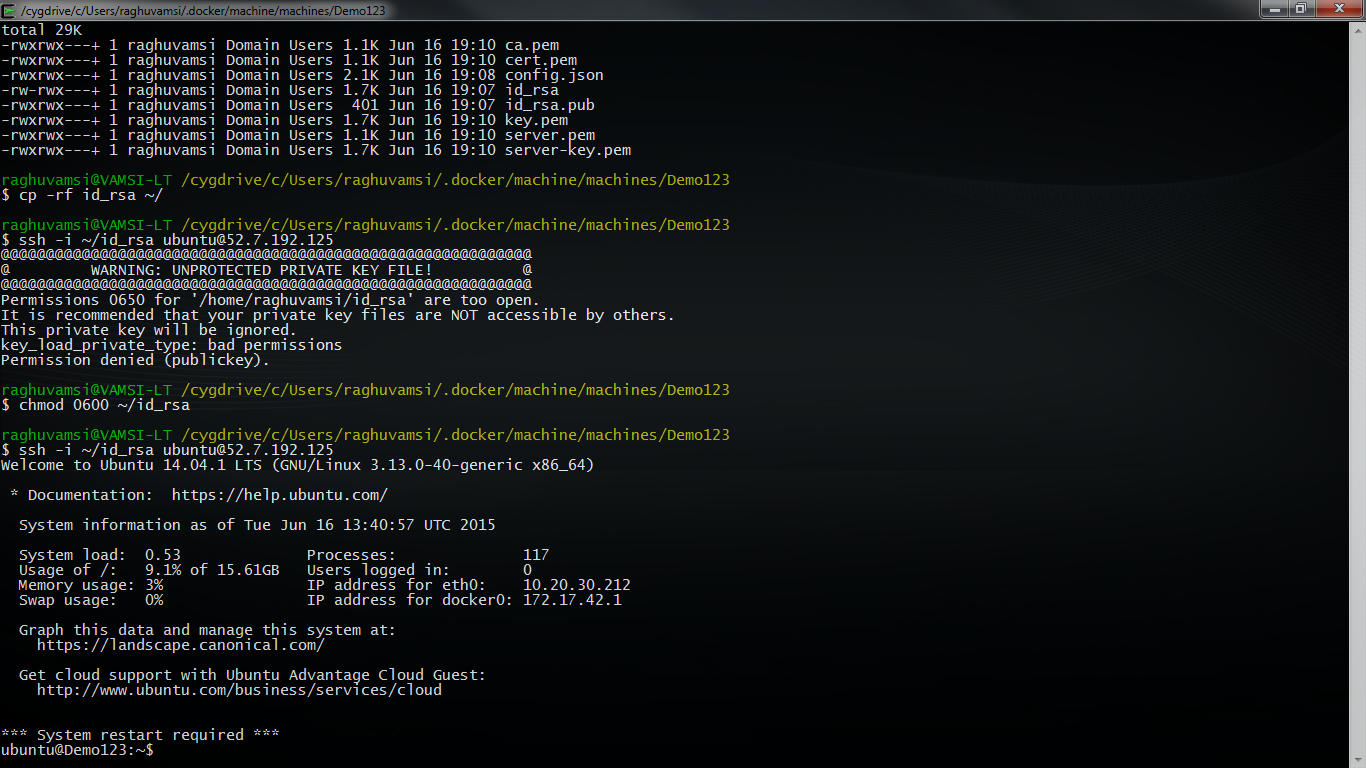
And now we can run all the docker commands on this pc.If you would like to login to this machine you need to use the pem key created for this machine at ~/$USER_HOME/.docker/machine/machines/$MACHINE_NAME/id_rsa

docker-machine5

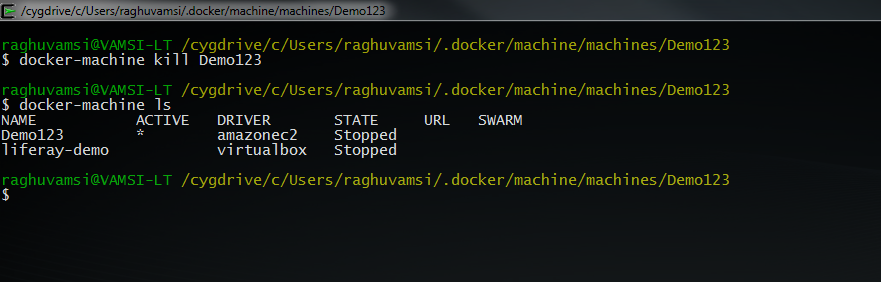
I will kill or destroy this machine with the following command

docker-machine6

Docker-machine comes with some more commands to inspect the instance and check its version with

docker-machine inspect Demo123   -> Inspect information about a machine
docker-machine config Demo123    -> Print the connection config for machine

Stay Tuned for the Second part of it on how we integrate a Swarm Cluster with multiple Instances across regions on AWS

Monitoring Micro Services on Docker With Consul

This Topic might be interesting to the people who are looking out for an alternative to monitoring tools like Nagios,Sensu or Service Discovery tools like Etcd.

consul-logo

Consul Comes from a Different Idea where it serves the problem of monitoring and service discovery to keep all the services in a service ring which are in sync all the time and shows their health on a Consul UI.

consul_layers

Consul Works on Gossip Protocol which makes other agents or servers to get attached to the service ring and make them in to a high available cluster environment across data centers.

There is other good post to understand the list of protocols available and how they work.

There is a Better Post of this on How to implement a Consul Cluster and add services to monitor through Consul UI but this tutorial may take a step ahead in installing and creating a consul cluster on a Docker Based Infrastructure.


Consul Service Structure (5)


The Above Diagram Represents the Service Chain of a Consul on a Docker Infrastructure.

Here is the Requirement on how we first initially plan the setup

Container 1 — ubuntu 14.04 — Apache2 Service — Consul Server

Container 2 — ubuntu 14.04 — Gerrit Service — Consul Server

Container 3 — ubuntu 14.04 — Consul Web UI — Consul Client

Lets start the first consul container which runs the gerrit service internally.

consul-server01

We will launch another container and start bootstrapping that with the consul agent as server

consul-server02

Now lets add both the servers to the Consul service ring

consul-server01-02-join

Now lets join the client for a Consul UI

consul-client01

Lets have a look on the UI

consul-webui

To see the list of members at the CLI we use consul members command to check the list of servers attached inside a service ring

consul-client-status

Services

Services are something like checks on the machines to know if particular service on the machine is running or not.We can relate this mechanism as plugins for any of the monitoring tools we have presently in the market like Nagios,Sensu,Zabbix.

The DSL for writing a Service check Plugin in Cosnul is in JSON format with some defined keys and a syntax to follow.

For this example we have created a service file apache2 service which is running on 172.17.0.115 at port 80

{
 "service":{
 "name": "apache2",
 "tags": ["server-02"],
 "address": "172.17.0.115",
 "port":80,
 "check":{
 "script" : "curl 172.17.0.115:80 >/dev/null 2>&1",
 "interval": "10s"
 }
}
}

We have created a service file for Gerrit service as well which we are running on 172.17.0.114 at port 8080

{
"service":{
 "name":"gerrit",
 "tags":["server-01","gerrit"],
 "address": "172.17.0.114",
 "port": 8080,
 "check":{
 "script": "curl 172.17.0.114:8080 >/dev/null 2>&1",
 "interval": "10s"
 }
}
}

Before making these service files available for Consul ui we need to create a folder to store these so i created a folder in /opt/services and we need to restart the client to make these service files available for the client to start checking for the services on the remote containers.

with the given below command on the client machine we can join to the service ring and also make the service checks start from the folder and files we have created

consul agent -data-dir /tmp/consul -client 0.0.0.0 -ui-dir /opt/dist -join 172.17.0.115 -config-dir /opt/services > consul-client-01.log 2>&1

Here is how the ui shows the Services based upon the tag which we gave in the service files

consul-client-status-apache2

Lets have a look in detail about the services

consul-client-status-indetail

Will Check if the services are working fine and detect if  both the services went wrong.

consul-client-status-indetail-statusfails

There are many More Options to explore in Consul like Locks ,Events,Monitor,Watch which i will be covering them in the next post.

Dockerstack Integrated Deployments – Programmatic Way of Ansible

dockerstackDockerstack a Open source tool started with an Idea to make Docker based Integrations much more easier and efficient to have a control over the Infrastructure which runs the Docker containers.

Integrated Deployments was one of the Continuous Deployment trend which Dockerstack is introducing to cultivate the Practices for Better and Concrete Deployments across Public and Private Cloud Deployments.

As a First Step we thought of doing a integration of Ansible which is one of the Light-Weighted Configuration management tool(so far seen with other tools with Less learning Curve and effective DSL to understand) to make deployments across the containers.

Initially every user in the Dockerstack application can create their unique Public and Private Keys at their Settings Page.


createsshkeys                                                                         Fig 1.0 Creation of SSH Keys

Later the creation of SSH Keys you get the Keys Displayed and by default the keys are generated in RSA.

keyscreated

                                                                        Fig 1.1 Public and Private Keys of User

After the Successfull creation of the keys and before the creation of Ansible Configuration files it is manditory that  your server which runs the Dockerstack application should have ansible installed.

If You Confirm the installation then you may have to create the Configuration files for the ansible to takeover the user specific environment configuration to make ansible run smoothly.

ansibleconf                                                        Fig 1.2 Ansible Configuration file

Every User have their own specific ansible.cfg file which makes the ansible to work based upon their environment setup.(ansible.cfg have its own fine tuned settings for the ansible work around multiple configuration files across multiple users)

The hosts file which is the main route file for the ansible to read and make deployments across the containers.

By default we make the Loopback addresses 127.0.0.1 as its first machine to interact.

hostsfile                                                              Fig 1.3 Ansible Hosts File

Now lets check whether ansible can grab these settings and make us feel happy with its basic ping pong response,before this we need to make sure the public key is being shared to the specific user to make the ansible process easy

addkey

                                                          Fig 1.4 Sharing the Public Key

Every user home directory is a GUID key based folder which holds the SSH and Ansible Keys and Configurations.

After the Key is Added and if you want to check everything works at a command line you can try with he ansible CLI like this (This step is optional if you are 100% confident on the tool)

checking                                                               Fig 1.5 Ansible Test Run from CLI

If your Configuration is perfect you will be getting a reply like this

checkdone                                                          Fig 1.6 Result Back from the Ansible CLI

We are being using the -vvvv for detailed understanding of the ansible tool on how it takes the configuration and how the response hits back from the server which it was suppose to send the shell command to execute.

Now lets see if the same response can be captured back on the Front-end

trycheck

                                                          Fig 1.7 Checking the Hosts file from the UI

Click on the check hosts button which is available under the Check tab and see the Magical Output
checksuccess

                                                             Fig 1.8 Magical Response in the UI


As a First step we made the ansible to make the host check Programatically and we may also include to make ansible deploy playbooks across the containers easily from the Dockerstack Application Dashboard.

To know more updates about the Dockerstack application here are some of the Reference urls

HomePage – Dockerstack.org

Source Code – github.com\dockerstack